
📸 Photography Discussion Roundtable
Monday nights, 7:00 PM ET on BrandMeister TG 31266
Step into the world of 35mm photography with the Photography Discussion Roundtable, held every Monday evening at 7:00 PM ET on BrandMeister DMR Talkgroup 31266 — the MichiganOne Nets channel. This engaging net is your chance to explore the art and science of photography, ask questions, and sharpen your skills in a welcoming, knowledge-rich environment.
Hosted by James N8TMP, Bob KB8DQQ, and Rick AD8KN, each brings a wealth of experience to the mic. Bob and James are seasoned wedding photographers, while Rick adds deep technical insight and practical know-how. Together, they guide discussions on camera features, techniques, terminology, and everything from aperture to artistic vision.
Whether you’re just starting out or looking to refine your craft, tune in and join the conversation. Your next great shot starts here.
Your Photography Discussion Roundtable team members are:
Bob KB8DQQ James N8TMP Rick AD8KN


https://michiganonedmrtech.net/photography/


Shooting in Manual (M) Mode on a digital camera gives you complete creative control over your exposure. Exposure is governed by the “Exposure Triangle”: ISO, Aperture, and Shutter Speed. Mastering their relationship is key.
Steps for Shooting in Manual Mode
Follow these steps to set up your shot for correct exposure and desired look:
-
Choose ISO
The ISO determines your camera sensor’s sensitivity to light.
- Goal: Keep ISO as low as possible for the cleanest, least “grainy” image.
- Settings:
- Bright Light (Daytime Outdoors): Start at your camera’s native minimum ISO (usually ISO 100 or 200).
- Dimmer Light (Indoors, Night): Increase the ISO (e.g., 400, 800, 1600) to brighten the image. Remember, higher ISO introduces digital noise (grain).
-
Set Aperture and Shutter Speed
Decide on your creative priorities first, then use your camera’s metering system to balance the exposure.
- Aperture (f-stop): Controls the depth of field (how much of the image is in focus).
- Shallow Depth of Field (Blurry background/bokeh): Use a low f-number (e.g., f/1.4, f/2.8).
- Deep Depth of Field (Everything in focus): Use a high f-number (e.g., f/8, f/16).
- Shutter Speed: Controls how long the sensor is exposed to light and manages motion.
- Freeze Motion (Sports, Action): Use a fast shutter speed (e.g., 1/500 sec or faster).
- Introduce Motion Blur (Waterfalls, Light Trails): Use a slow shutter speed (e.g., 1/30 sec or slower). Use a tripod for speeds slower than sec to prevent camera shake blur.
-
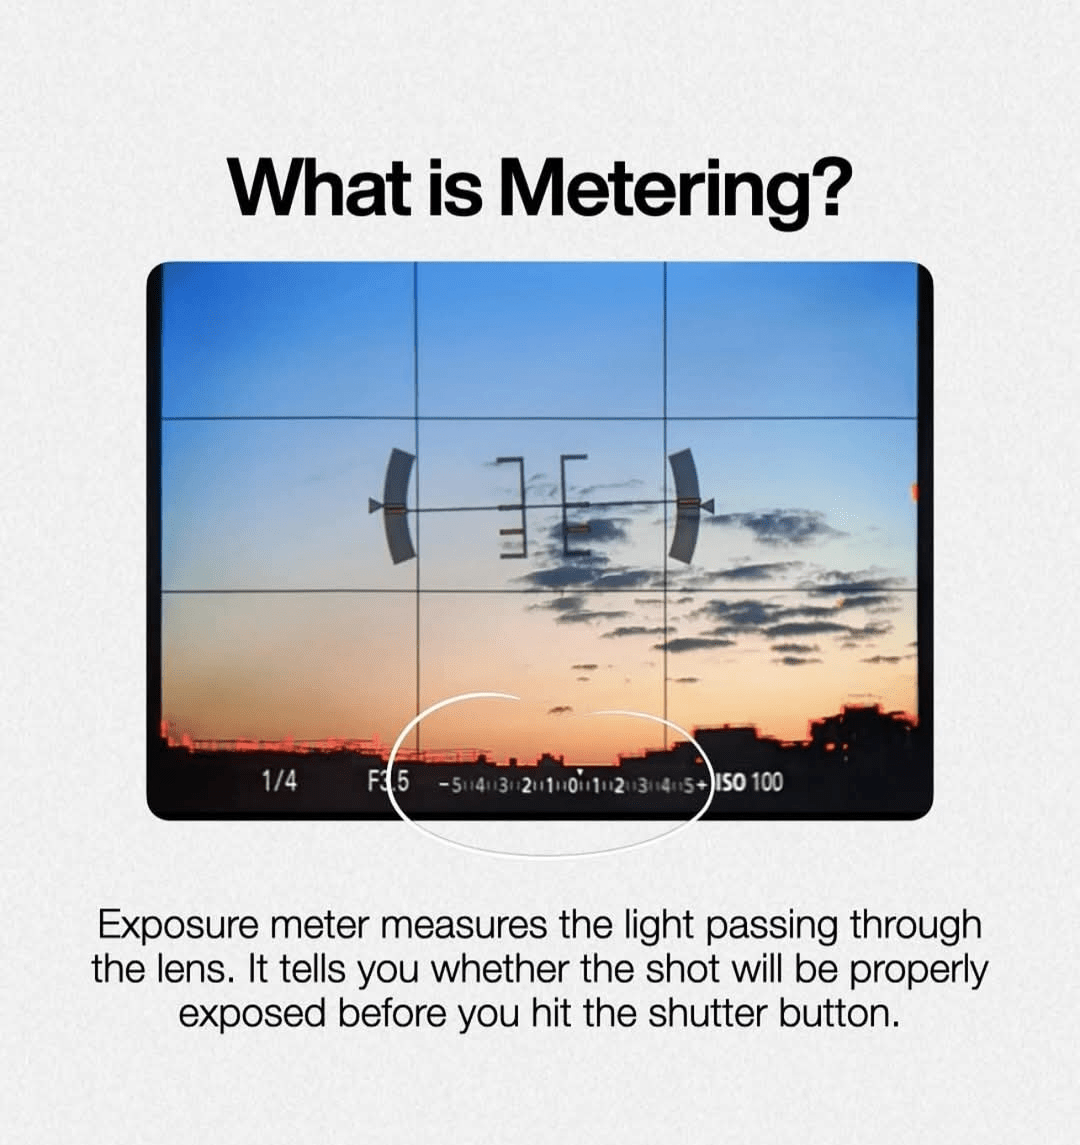
Metering for Correct Exposure
Once you’ve made your creative choices for Aperture and Shutter Speed, use the in-camera light meter to check and adjust for correct exposure.
- Look at the Meter: In your viewfinder or on your LCD/screen, you’ll see an exposure scale (usually with a number line from negative to positive).
- Adjust for Center: Adjust your Shutter Speed (or sometimes ISO) until the indicator on the scale rests at the center (zero). This indicates the camera’s recommended correct exposure for the scene.
4. Check Histogram and Make Adjustments
Take a test shot and review the results, focusing on the histogram, which is the most accurate way to judge exposure.
- Histogram: A graph representing the tonal distribution of your image: shadows on the left, mid-tones in the center, and highlights on the right.
- Goal: Aim for a graph that is generally contained within the left and right edges.
- If the graph is pushed up against the left edge (clipped shadows), the image is likely underexposed (too dark).
- If the graph is pushed up against the right edge (clipped highlights), the image is likely overexposed (too bright).
- Adjust:
- Too Dark: Increase exposure by slowing the Shutter Speed, opening the Aperture (lower f-number), or increasing the ISO.
- Too Bright: Decrease exposure by speeding up the Shutter Speed, closing the Aperture (higher f-number), or decreasing the ISO.
Prioritize changing the setting that least compromises your creative intent (e.g., if you need to maintain a shallow depth of field, adjust Shutter Speed or ISO before Aperture).
This video offers a complete guide to using Manual Mode and the exposure triangle:
How to Shoot in Full Manual Mode – Complete Guide for Photographers
https://youtu.be/OuAAKCJDPXY?si=WjAWwBiiVwka1Lji
